
VPS主机一般都会提供免费的Linux发行版作为主机操作系统,并且对于低配置主机来说,采用Linux系统也是比较明智的选择。近些年来,Google为Linux作了一个重大贡献,就是优化TCP传输的BBR算法,这个算法可以有效的利用网络带宽,提升传输效率。由于BBR出色的使用效果,于是被引入到 4.10 以后的内核中。
对于国内VPS用户来说,使用VPS搭建代理服务器的不在少数,多数会使用VPS厂商提供的Linux发行版。在众多Linux发行版中,RHEL/CentOS是比较注重系统稳定性,这也造成RHEL/CentOS内核更新较为保守,不像Ubuntu和Arch那样可以方便得到官方版的最新内核。
本教程将详细讲解如何使用第三方”yum”源来安装最新版内核,并且启用Google BBR。由于RHEL/CentOS 的6.x版同7.x版在架构中有很大区别,所以教程将分别讲解。
1] RHEL/CentOS 6.x 版更新内核
首先引入第三方源ELRepo的公钥:
# rpm --import https://www.elrepo.org/RPM-GPG-KEY-elrepo.org
之后安装ELRepo源至系统:
# rpm -Uvh http://www.elrepo.org/elrepo-release-6-8.el6.elrepo.noarch.rpm
最后使用如下命令将内核软件安装至系统:
# yum --enablerepo=elrepo-kernel install kernel-ml
内核安装成功后,就需要修改启动项来设置使用新安装的内核来启动系统。RHEL/CentOS 的6.x一般使用”grub”来启动系统,需要修改/boot/grub/grub/menu.lst文件中的内容来手动设置启动项目。文件示意如下:
 # grub.conf generated by anaconda
 #
 # Note that you do not have to rerun grub after making changes to this file
 # NOTICE:  You do not have a /boot partition.  This means that
 #          all kernel and initrd paths are relative to /, eg.
 #          root (hd0,0)
 #          kernel /boot/vmlinuz-version ro root=/dev/vda1 console=ttyS0 console=tty0 printk.time=1 panic=5
 #          initrd /boot/initrd-[generic-]version.img
 #boot=/dev/sda
 default=0
 timeout=5
 splashimage=(hd0,0)/boot/grub/splash.xpm.gz
 hiddenmenu
 serial --unit=0 --speed=9600 --word=8 --parity=no --stop=1
 terminal --timeout=3 serial console
 title CentOS (4.15.9-1.el6.elrepo.x86_64)
	 root (hd0,0)
	 kernel /boot/vmlinuz-4.15.9-1.el6.elrepo.x86_64 ro root=/dev/vda1 console=ttyS0 console=tty0 printk.time=1 panic=5 rd_NO_LUKS  KEYBOARDTYPE=pc KEYTABLE=us LANG=C rd_NO_MD SYSFONT=latarcyrheb-sun16 rd_NO_LVM crashkernel=auto   rd_NO_DM
	 initrd /boot/initramfs-4.15.9-1.el6.elrepo.x86_64.img
 title CentOS (2.6.32-696.20.1.el6.x86_64)
	 root (hd0,0)
	 kernel /boot/vmlinuz-2.6.32-696.20.1.el6.x86_64 ro root=/dev/vda1 console=ttyS0 console=tty0 printk.time=1 panic=5 rd_NO_LUKS  KEYBOARDTYPE=pc KEYTABLE=us LANG=C rd_NO_MD SYSFONT=latarcyrheb-sun16 rd_NO_LVM crashkernel=auto   rd_NO_DM
	 initrd /boot/initramfs-2.6.32-696.20.1.el6.x86_64.img
可以看到,系统的每个启动菜单项对应一个title项,”title”按从0开始,由上到下排列,示例中”title CentOS (4.15.9-1.el6.elrepo.x86_64)”序号为0,而”title CentOS (2.6.32-696.20.1.el6.x86_64)”序号为1。然后修改default配置项目的值等于对应的序号即可。示例中使用”default=0″就表示使用”CentOS (4.15.9-1.el6.elrepo.x86_64)”项目启动,也就表示使用新安装的内核启动了系统。修改完成后,重新启动系统,然后输入如下命令检测是否使用新的内核启动了系统:
# uname -r
全部操作过程如下图所示:
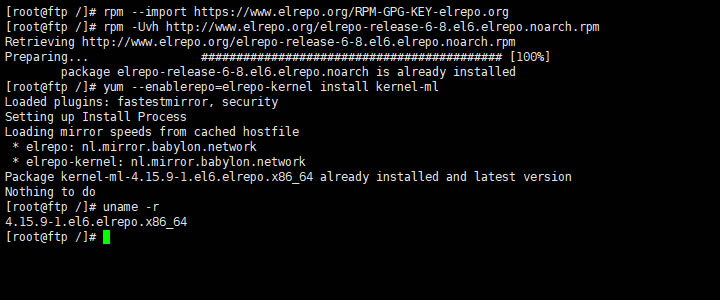
图.1 REHL/CentOS 6 安装ELRepo内核
2] RHEL/CentOS 7.x版更新内核
RHEL/CentOS 7.x系统更新内核同6.x版类似,使用如下命令完成内核的安装:
 # rpm --import https://www.elrepo.org/RPM-GPG-KEY-elrepo.org
 # rpm -Uvh http://www.elrepo.org/elrepo-release-7.0-3.el7.elrepo.noarch.rpm
 # yum --enablerepo=elrepo-kernel install kernel-ml
可以看到,安装过程同6.x版类似,也分为安装公钥、安装ELRepo软件源及安装内核,只不过安装的ELRepo软件源同6.x版不同。安装成功后 ,就需要修改启动项来以新内核启用主机了。RHEL/CentOS 7.x的启动管理器采用了”grub2″,所以修改启动项的办法也比较简单,方法如下:
 # cat /boot/grub2/grub.cfg | grep menu
 if [ x"${feature_menuentry_id}" = xy ]; then
   menuentry_id_option="--id"
   menuentry_id_option=""
 export menuentry_id_option
   set timeout_style=menu
 menuentry 'CentOS Linux (4.15.9-1.el7.elrepo.x86_64) 7 (Core)' --class centos --class gnu-linux --class gnu --class os --unrestricted $menuentry_id_option 'gnulinux-3.10.0-327.36.3.el7.x86_64-advanced-7ae09280-d490-454e-b3bf-49e2c83c0643' {
 menuentry 'CentOS Linux (3.10.0-693.21.1.el7.x86_64) 7 (Core)' --class centos --class gnu-linux --class gnu --class os --unrestricted $menuentry_id_option 'gnulinux-3.10.0-327.36.3.el7.x86_64-advanced-7ae09280-d490-454e-b3bf-49e2c83c0643' {
 menuentry 'CentOS Linux (0-rescue-15776e03cc722e43bd0b0ef19a729fd3) 7 (Core)' --class centos --class gnu-linux --class gnu --class os --unrestricted $menuentry_id_option 'gnulinux-0-rescue-15776e03cc722e43bd0b0ef19a729fd3-advanced-7ae09280-d490-454e-b3bf-49e2c83c0643' {
 # This file provides an easy way to add custom menu entries.  Simply type the
 # menu entries you want to add after this comment.  Be careful not to change

 # grub2-set-default 'CentOS Linux (4.15.9-1.el7.elrepo.x86_64) 7 (Core)'
首先用”cat”命令查看/boot/grub2/grub.cfg文件中的”menuentry”项,然后用”grub2-set-default”命令将最新版的内核设置为默认启动项即可。最后还是同样重新启动系统并查看内核信息,操作示意图如下:
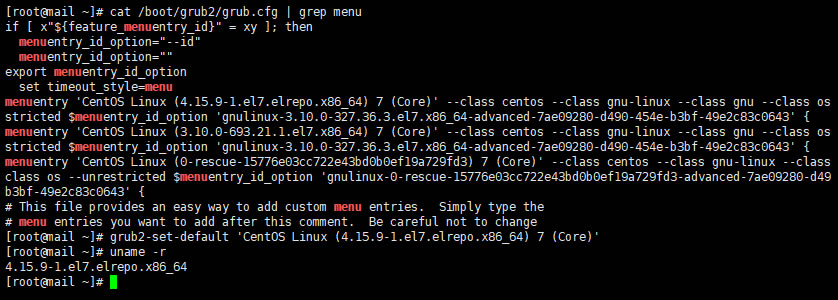
图.2 RHEL/CentOS 7安装ELRepo内核
3] 启动BBR
内核更新成功后,就可以通过修改系统配置文件/etc/sysctl.conf来达到启用BBR的目的。修改配置文件”sysctl.conf”文件为如下内容(如果不存在配置项则手工添加):
 # sysctl settings are defined through files in
 # /usr/lib/sysctl.d/, /run/sysctl.d/, and /etc/sysctl.d/.
 #
 # Vendors settings live in /usr/lib/sysctl.d/.
 # To override a whole file, create a new file with the same in
 # /etc/sysctl.d/ and put new settings there. To override
 # only specific settings, add a file with a lexically later
 # name in /etc/sysctl.d/ and put new settings there.
 #
 # For more information, see sysctl.conf(5) and sysctl.d(5).

 # Google BBR
 net.core.default_qdisc=fq
 net.ipv4.tcp_congestion_control=bbr
其实,主要内容就是添加了”net.core.default_qdisc”和”net.ipv4.tcp_congestion_control”两项。添加完成后,可以通过如下命令来验证BBR是否启用成功:
 # sysctl -p
 # sysctl net.ipv4.tcp_available_congestion_control
 # lsmod | grep bbr
当看到如下图的输出内容,提示”tcp_bbr”有内容时,那么就恭喜你,表示BBR启用成功了。
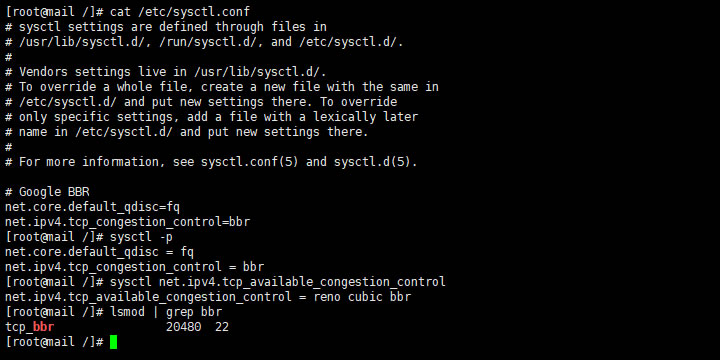
图.3 RHEL/CentOS 启用BBR
至此,就完成了RHEL/CentOS 系统内核的更换和启用BBR优化,可以放心的开启代理服务了。如果还有其它问题,可以留言进行交流。