![]()
FreeBSD是一款类UNIX操作系统,就像Linux一样,也是开源操作系统。与Linux不同的是,FreeBSD是完整的操作系统,包含独立内核和应用软件。FreeBSD以其超凡的稳定性以及卓越的安全性著称,在服务器领域占据一席之地。本教程将详细讲解如何使用FreeBSD 11搭建FAMP(FreeBSD Apache MariaDB PHP)环境。
1] 安装FreeBSD 11发行版
首先,安装FreeBSD 11,这个对于VPS来说相对容易,在服务商的主机操作系统选择页面选择就是了,当然也可以使用虚拟环境安装虚拟机。总之,具有可以使用的FreeBSD 11主机即可。安装完成后,可以使用如下命令查看一下发行版的具体信息:
root@freebsd:~ # uname -a
FreeBSD freebsd 11.2-RELEASE FreeBSD 11.2-RELEASE #0 r335510: Fri Jun 22 04:32:14 UTC 2018     root@releng2.nyi.freebsd.org:/usr/obj/usr/src/sys/GENERIC  amd64
root@freebsd:~ #
2] 安装Apache 2.4
FreeBSD同样提供了软件包安装工具”pkg”,使用这个工具安装软件,可以有效的避免很多软件包依赖性问题。Apache这款软件当然可以采用pkg方式安装。
root@freebsd:~ # pkg install apache24
The package management tool is not yet installed on your system.
Do you want to fetch and install it now? [y/N]: y
Bootstrapping pkg from pkg+http://pkg.FreeBSD.org/FreeBSD:11:amd64/quarterly, please wait...
Verifying signature with trusted certificate pkg.freebsd.org.2013102301... done
Installing pkg-1.10.5_5...
Extracting pkg-1.10.5_5: 100%
Updating FreeBSD repository catalogue...
pkg: Repository FreeBSD load error: access repo file(/var/db/pkg/repo-FreeBSD.sqlite) failed: No such file or directory
Fetching meta.txz: 100%    944 B   0.9kB/s    00:01
Fetching packagesite.txz: 100%    6 MiB   3.4MB/s    00:02
Processing entries: 100%
FreeBSD repository update completed. 32577 packages processed.
All repositories are up to date.
Updating database digests format: 100%
The following 12 package(s) will be affected (of 0 checked):

New packages to be INSTALLED:
        apache24: 2.4.35
        libnghttp2: 1.33.0
        libxml2: 2.9.7
        expat: 2.2.6_1
        perl5: 5.26.2
        pcre: 8.42
        apr: 1.6.3.1.6.1_1
        gdbm: 1.13_1
        indexinfo: 0.3.1
        readline: 7.0.3_1
        gettext-runtime: 0.19.8.1_1
        db5: 5.3.28_7

Number of packages to be installed: 12

The process will require 146 MiB more space.
34 MiB to be downloaded.

Proceed with this action? [y/N]:
输入”y”键确认安装。安装完成后,在”/etc/rc.conf”文件中添加如下内容,将Apache设置为开机自动运行:
apache24_enable="yes"
启动Apache24服务器:
root@freebsd:~ # service apache24 start
Performing sanity check on apache24 configuration:
AH00557: httpd: apr_sockaddr_info_get() failed for freebsd
AH00558: httpd: Could not reliably determine the server's fully qualified domain name, using 127.0.0.1. Set the 'ServerName' directive globally to suppress this message
Syntax OK
Starting apache24.
AH00557: httpd: apr_sockaddr_info_get() failed for freebsd
AH00558: httpd: Could not reliably determine the server's fully qualified domain name, using 127.0.0.1. Set the 'ServerName' directive globally to suppress this message
root@freebsd:~ #
在FreeBSD系统中,Apache的配置文件为”/usr/local/etc/apache24/httpd.conf”;默认文档根目录为”/usr/local/www/apache24/data”。现在,就可以通过浏览器访问主机的IP地址(http://IP),验证Apache是否安装成功。我的主机IP地址为”192.168.1.211″,浏览器访问后若显示如下内容,则表示Apache 24 安装成功。

图.1 验证FreeBSD系统Apache服务
3] 安装MariaDB
由于Oracle有心将MySQL闭源化,所以建议采用其替代软件MariaDB作为数据库服务器。首先,查看一下FreeBSD 11系统可以安装的MariaDB发行版信息:
root@freebsd:~ # pkg search mariadb
mariadb-connector-c-3.0.6      MariaDB database connector for C
mariadb-connector-odbc-3.0.3   MariaDB database connector for odbc
mariadb100-client-10.0.36_2    Multithreaded SQL database (client)
mariadb100-server-10.0.36_2    Multithreaded SQL database (server)
mariadb101-client-10.1.35_1    Multithreaded SQL database (client)
mariadb101-server-10.1.35_1    Multithreaded SQL database (server)
mariadb102-client-10.2.17      Multithreaded SQL database (client)
mariadb102-server-10.2.17      Multithreaded SQL database (server)
mariadb103-client-10.3.10_1    Multithreaded SQL database (client)
mariadb103-server-10.3.10_1    Multithreaded SQL database (server)
mariadb55-client-5.5.62        Multithreaded SQL database (client)
mariadb55-server-5.5.62        Multithreaded SQL database (server)
root@freebsd:~ #
现在,安装MariaDB的最新版,注意服务器和客户端软件都要安装:
root@freebsd:~ # pkg install mariadb103-server mariadb103-client
Updating FreeBSD repository catalogue...
FreeBSD repository is up to date.
All repositories are up to date.
The following 8 package(s) will be affected (of 0 checked):

New packages to be INSTALLED:
        mariadb103-server: 10.3.10_1
        mariadb103-client: 10.3.10_1
        libedit: 3.1.20170329_2,1
        unixODBC: 2.3.7
        galera: 25.3.24
        boost-libs: 1.68.0_1
        icu: 62.1_2,1
        libiconv: 1.14_11

Number of packages to be installed: 8

The process will require 452 MiB more space.
54 MiB to be downloaded.

Proceed with this action? [y/N]:
同样,输入”y”进入安装,安装成功后将以下内容添加到”/etc/rc.conf”文件中,以便MariaDB可以开机启动:
mysql_enable="yes"
MariaDB的默认配置文件为”/usr/local/etc/my.cnf”,安装完成后,启动MariaDB数据库,使用之后两条命令中的任意一条修改root用户密码,提高数据库安全性:
root@freebsd:~ #service mysql-server start
root@freebsd:~ #'/usr/local/bin/mysqladmin' -u root password 'new-password'
OR
root@freebsd:~ #' '/usr/local/bin/mysql_secure_installation''
密码设置好后,可以登录数据库并查看相应信息,以确认MariaDB安装成功:
root@freebsd:~ # mysql -uroot -p
Enter password:
Welcome to the MariaDB monitor.  Commands end with ; or \g.
Your MariaDB connection id is 16
Server version: 10.3.10-MariaDB FreeBSD Ports

Copyright (c) 2000, 2018, Oracle, MariaDB Corporation Ab and others.

Type 'help;' or '\h' for help. Type '\c' to clear the current input statement.

MariaDB [(none)]> SHOW DATABASES;
+--------------------+
| Database           |
+--------------------+
| information_schema |
| mysql              |
| performance_schema |
+--------------------+
3 rows in set (0.001 sec)

MariaDB [(none)]>
4] 安装PHP 7
FreeBSD 11安装PHP同样可以采用pkg方式,目前最新的发行版为PHP 7.2.10,使用如下命令安装PHP 7.2和mysqli扩展:
root@freebsd:~ #pkg install mod_php72 php72-mysqli
Updating FreeBSD repository catalogue...
FreeBSD repository is up to date.
All repositories are up to date.
The following 4 package(s) will be affected (of 0 checked):

New packages to be INSTALLED:
        mod_php72: 7.2.10
        php72-mysqli: 7.2.10
        libargon2: 20171227_1
        php72: 7.2.10

Number of packages to be installed: 4

The process will require 29 MiB more space.
5 MiB to be downloaded.

Proceed with this action? [y/N]:
安装完成后,使用如下命令为PHP 7添加配置文件:
root@freebsd:~ #  ls /usr/local/etc/php.*
/usr/local/etc/php.conf                 /usr/local/etc/php.ini-production
/usr/local/etc/php.ini-development
root@freebsd:~ # cp /usr/local/etc/php.ini-development /usr/local/etc/php.ini
采用pkg方式安装的PHP 7作为Apache的一个模块存在,要使用PHP,则需要对Apache的配置文件”/usr/local/etc/apache24/httpd.conf”进行配置。注意配置文件中确实具有如下内容,如果没有,则在相应位置手动添加即可:
LoadModule php7_module        libexec/apache24/libphp7.so
<IfModule>
AddType application/x-httpd-php .php
</IfModule>
同样,还需要为”.php”文件设置默认:
<IfModule dir_module> DirectoryIndex index.php index.html</IfModule>
最后,按照PHP模块的提示,在配置文件最后添加如下内容:
<FilesMatch "\.php$">
    SetHandler application/x-httpd-php
</FilesMatch>
<FilesMatch "\.phps$">
    SetHandler application/x-httpd-php-source
</FilesMatch>
配置文件修改完成后,使用以下命令进行检验,遇到问题的话就根据提示信息修改,如果提示”OK”,则说明没有错误,可以使用PHP:
root@freebsd:~ # httpd -t
AH00557: httpd: apr_sockaddr_info_get() failed for freebsd
AH00558: httpd: Could not reliably determine the server's fully qualified domain name, using 127.0.0.1. Set the 'ServerName' directive globally to suppress this message
Syntax OK
root@freebsd:~ #
Apache配置正确后,可以向其默认根目录添加”info.php”文件,以验证PHP 7是否安装成功:
root@freebsd:~ # echo '<?php phpinfo() ; ?>' > /usr/local/www/apache24/data/info.php
最后重新启动Apache服务器,用浏览器访问”info.php”文件,不出意外的话,会见到如下页面:
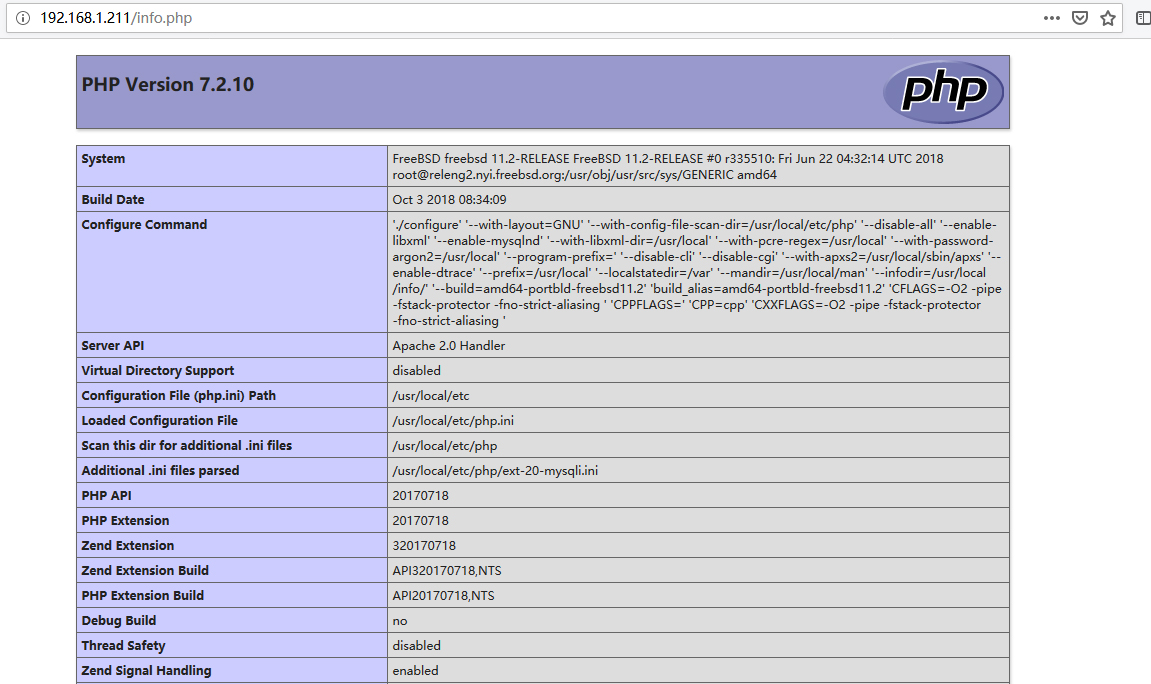
图.2 FreeBSD系统PHP 7.2.10信息页面
至此,FAMP运行环境就全部搭建完成,使用起来同LAMP类似,有兴趣的小伙伴们不妨尝试一下超级稳定的FAMP环境。